Saturday, December 27, 2014

Letting it go


Before I had kids, I was sure that I'd be the kind of mother who sewed all her kids' Halloween costumes. Now that I'm actually a parent, I can't believe that I've sewn even one such costume. Here it is!

Simplicity 0733 gets good reviews from Pattern Review and deserves them. The two suggestions from reviewers are both spot-on: shorten the skirt and cape lengths by at least 5" (even on my tall girl) and line the bodice (I didn't, and my daughter refused to put the dress on from the very first, shaking-with-excitement moment until we located a suitable t-shirt to wear beneath it). The appliqués at the end seem ridiculously fussy but they were super-easy, especially if you only do a few instead of the full dozen or so they suggest. Just remember that you're going to shorten the cape before you start fusing those suckers on. I skipped the part about fabric-painting the edges of the appliqués and suffered no ill effects.

Since I mostly sew with organic cotton knits, this was a really fun change of scenery. So much sparkle! So much bang for the buck! The zipper was a slippery disaster of puckers but everything else was a breeze.

If you're shopping for these fabrics at JoAnn or another big chain store as I did, I recommend pushing beyond the Frozen fabric display area and heading to the dress fabrics section. You will save 50% or more per yard: for example, the bodice fabric on display in the front of the shop was $25/yard but in the back I found something similar for $10/yard. You do really need 4 fabrics and 2 trims, but you can buy a lot less of the appliqué fabric if you know you're going to whittle down the number of appliqués. For the full allowance of each fabric, I spent $30 on supplies (not including pattern or zipper).


Saturday, October 18, 2014

Tutorial: Reversible Bukhari Kid's Kippah


My son started Hebrew school this fall and I am trying to get him comfortable with the idea of wearing a kippah (yarmulke) in synagogue. On Yom Kippur, he was pretty excited about wearing my Bukhari-style kippah, so I thought I'd amplify that interest by bringing in some fabrics that shout YES to 6-year old boys. As you can tell from the rest of the blog, they are not exactly my style. Which is the whole point, I suppose.

This kippah is great because it's comfortable, machine washable, stays on the head of a small, active person without clips, and is totally reversible. I will use the term "lining fabric" in my directions, but both sides are completely wearable - the only difference is that the lining fabric side will have 2-3" of hand-stitching visible where the band meets the lid.

We did the whole project together this morning and it was really easy and fun, so I thought I'd pass on the directions in case they are useful to you (and so that I don't forget when I make my next one, which requires me to find princess fabric for one side and gymnastics fabric for the other).

Pre-wash your fabrics. You'll need 2/3 yard of two different lightweight 45" quilting cottons. If you're willing to cut your bands on the opposite grain (and I'm not enough of an expert to tell you where that might land you), you'll only need 1/4 yard. As a fabric miser, I felt that I had to let you know.

1. Find a kippah that's the right size or too big and pin it until the circumference is comfortable for the wearer. Measure the adjusted circumference and add 1.25" to it. You'll need to cut one rectangle cut to this length that is 3.75" wide (assuming a finished side band width of 2.5" for your kippah). For my son, we wanted a finished circumference of 21.5" so our rectangle was 22.75" x 3.75". I am using 5/8" seam allowances here.

2. Cut a circle that's 8.25" in diameter (note: if your rectangle is a different length, you should adjust the circle size accordingly). If there's a pattern in your fabric, think about where you want the pattern to fall on the kippah (my son wanted the Millennium Falcon in the middle on one side, and Wolverine centered on the other). We had some fun poking around the house for something this size, since we don't own a compass, and found a pot lid that was perfect!

3. Cut out 1 more rectangle and 1 more circle in your contrasting fabric.

4. Sew each rectangles to itself on the short end to make the 2 bands. Try band on wearer to be sure you're headed toward a good fit. Here's what you've got at this point:
One band sewn into a loop + one circle = lining
Testing band size - a tiny bit loose is okay because it's going to tighten up slightly once lined
5. Place pins around the circle at 4 equidistant points along the edge. Divide the band into 4 parts with pins as well, starting at the seam, then across from the seam, etc.

6. For your primary fabric, sew the band to the circle after pinning amply between your quartered pins. I found it best to do with the circle face up in the machine so that I could keep an eye on potential puckers and beat them out with a pin. For your lining/secondary fabric, do the same but leave a 2-3" gap in the stitching so that you can turn the garment later. Trim seam and press band away from circle (edge of ironing board is good for this).
Outer fabric kippah is sewn all the way around
Lining fabric kippah is sew nearly all the way around, leaving a small gap to turn fabric later
7. Nest one kippah inside the other, right sides together and side seamed lined up. Sew around, trim, and turn.
Right sides together, seams lined up


8. Hand-stitch closed the gap you left in the lining fabric. Press kippah (again, take advantage of the edge of your ironing board). Edgestitch along bottom of band.
Why yes, I am still in my bear pajamas. And I'm showing you the gap that you need to hand-stitch shut.
I have hand-stitched shut the gap and you can hardly see it by my thumb.

 10. Try it on and make sure you're good to go!

We are good to go.
Outer fabric, with Wolverine prominently displayed
Inner fabric, with Millennium Falcon front and center. Hand stitching is nearly invisible so this is truly reversible.

Sunday, September 14, 2014

Not a garment

And not even trying to be. I just revamped our appliance cozies (what?! you don't HAVE appliance cozies!?) and wanted to record the event.


These babies used to be light-blocking curtains at our old apartment. I brought them with us when we moved just in case...and found that the light-blocking liner was also water-proof and therefore useful for protecting this wooden buffet in our kitchen. The buffet itself deserves a much easier life but since we have no pantry, it is now responsible for housing our most essential appliances (the rest get dragged up and down from the basement), lunchboxes, tablecloths, and more. Too much more.

One curtain became the runner you see here (still lined) and the other curtain lost its lining, went through the washer and dryer (with no ill effects despite its dry clean only label), and became four cozies. One of which is lined up the wrong way.  Yes, I see that too.

I have fond memories of appliance cozies at my grandmothers' kitchens in the 1970s (quilted affairs with yellow and green pears, perhaps) and still think they are an easy way to keep tools dust- and oil- free in an active kitchen like ours. Throw them in the wash once a year and feel like a domestic heroine!

From my other life

My real job is teaching middle school French. So when I saw this fabric at the end of last school year, I just allowed myself to give into temptation. I still maintain that I will never wear holiday pins (you know, the pumpkin in October, the turkey in November...), but obviously my credibility is drying up with this fabulous new garment:


Behold the Lisette market tunic (Simplicity 2211) with a more basic sleeve (I copied from my Schoolhouse Tunic pattern), sewn from Timeless Treasures Paris Motif.  

I don't wear a lot of white but I feel this top will have its moments at the annual French fête, various department gatherings, and maybe a professional conference or two! My only question is whether to wear it to Back-to-School Night (i.e. Parents Night). What do YOU think?

Monday, August 18, 2014

Painted desert lace shawl


I knit a shawl back in 2002 that had me swearing up and down the beaches of Block Island as I dropped numerous yarnovers and attempted to rip out rows that were 300+ stitches long. It was a beauty, though, and one I wore almost daily for many, many winters. As said shawl has become mangy in the intervening decade-plus, I wanted to make a new one that would preserve its best qualities - a dash of color in the winter, a flexible triangle shape for various drapings and knottings - but without all the vacation cussing. 

And so, here is the Painted Desert Lace Shawl!


I saw this on display at Webs and decided to have a go at it in a different colorway. It was easy to knit (although I thought I was knitting up and not down for most of the project! Luckily this did not matter...) and the yarn was a pleasure to work with. The yarn softened up nicely in the washing and straightened up well for the blocking. With my sole skein, I was able to knit the shawl exactly as described and pictured. My only concerns are that I have some curling at the edges where I cast off and I wish it were a bit bigger, since it's a tad bit short to knot it in the back after draping the point down my back and bringing it around the front. 

Ready for winter now but happy to wait several months for its arrival!

Pintucks, voile, et a whole lotta flowers

There was a time in the late 80s when I owned a LOT of floral clothing. I had a navy floral mini-skirt, a beige floral jumper (remember those?!), and a Liberty-type button-down floral shirt that I bought in France with my bourgeois host mother's approval. 

Now it's been awhile and I found myself gazing longingly at the floral-patterned view of Simplicity 2365. The sewists of Pattern Review rather liked this one, and it seemed promising to me for two reasons: pintucks in the front (modern! on trend!) and roll-up sleeves with tabs (practical! yet something new to sew!).

After my big birthday, I decided to treat myself to some delicious fabric. This here is Budquette in Nightfall voile from the Emmy Grace collection by Bari J Ackerman for Art Gallery Fabric. What a mouthful! Let's just call it yummy voile for short. The fabric is amazing - super-soft, completely forgiving to sew with with, intricately patterned. Enough to make a girl who hasn't worn florals in a long, long time stop and think...why not?

About the pintucks. If you've never sewn them before, you should! But you must practice first. I was so much better the second time that I had to go back and rip out all five pintucks from the first time...which I was only able to bring myself to do at the very end, when it was twice as hard. Here's what I learned: don't attempt to mark the full pintuck lines on the fabric because it's $%#@ impossible. You're better off making a little snip at the top where the line begins, and a chalk mark at the end. Then, if you're using a thin fabric like this one, you can just fold the fabric in place and sew. But here's where I messed up. You need to sew seriously near the fold - as close as you can get without going over the edge. I used the inside hole of my presser foot as the guide, keeping the edge of the fold at the other end of the view hole while I sewed. If you make your pintucks too deep as I did at first, you get a terrible pooch at the bottom by your tummy. Don't do it! Though I regret not having photographed my botched job for your amusement.

This top fits great in a size 6 (I'm back to making the smallest size I see after my last mishap), although the voile is a bit lightweight which discourages its flowing seamlessly over the bum.

My Turn: Schoolhouse Tunic

Everyone and her auntie has made the Schoolhouse Tunic, and now it's my turn. My sis got me the pattern a few years ago when I started to make tunics, leggings and boots my teaching uniform. While I've found a few good narrow-wale corduory tunics on sale at Boden, I really want to make my own great ones. How hard can it be, right? My standard favorite has been the Lisette Portfolio tunic but I still find it challenging to identify patterns that make this great garment the way it should be - close-fitting, flattering, long-sleeved, and tush-concealing. On the latter point, I want to be more specific: absolutely no visible derrière, but also no fabric bunched up above said location.

I chose some koi voile in plum by Rashida Coleman-Hale, which features many of my new and old favorite colors: navy (new to me this year), fuschia (beloved since second grade) and puce/chartreuse (wonderful but hard to purchase accurately since I mostly shop online). What a winning combo! The deep colors offset the sheer nature of the fabric in a great way. For some reason until now I've mostly purchased voile and lawn in very light shades.

Having just been burned by sewing a too-small sleeveless top, I tried to be unstinting with my true size and made the 6/8. It fits like a small pup tent. But doesn't it look great on the hanger?


Tuesday, July 29, 2014

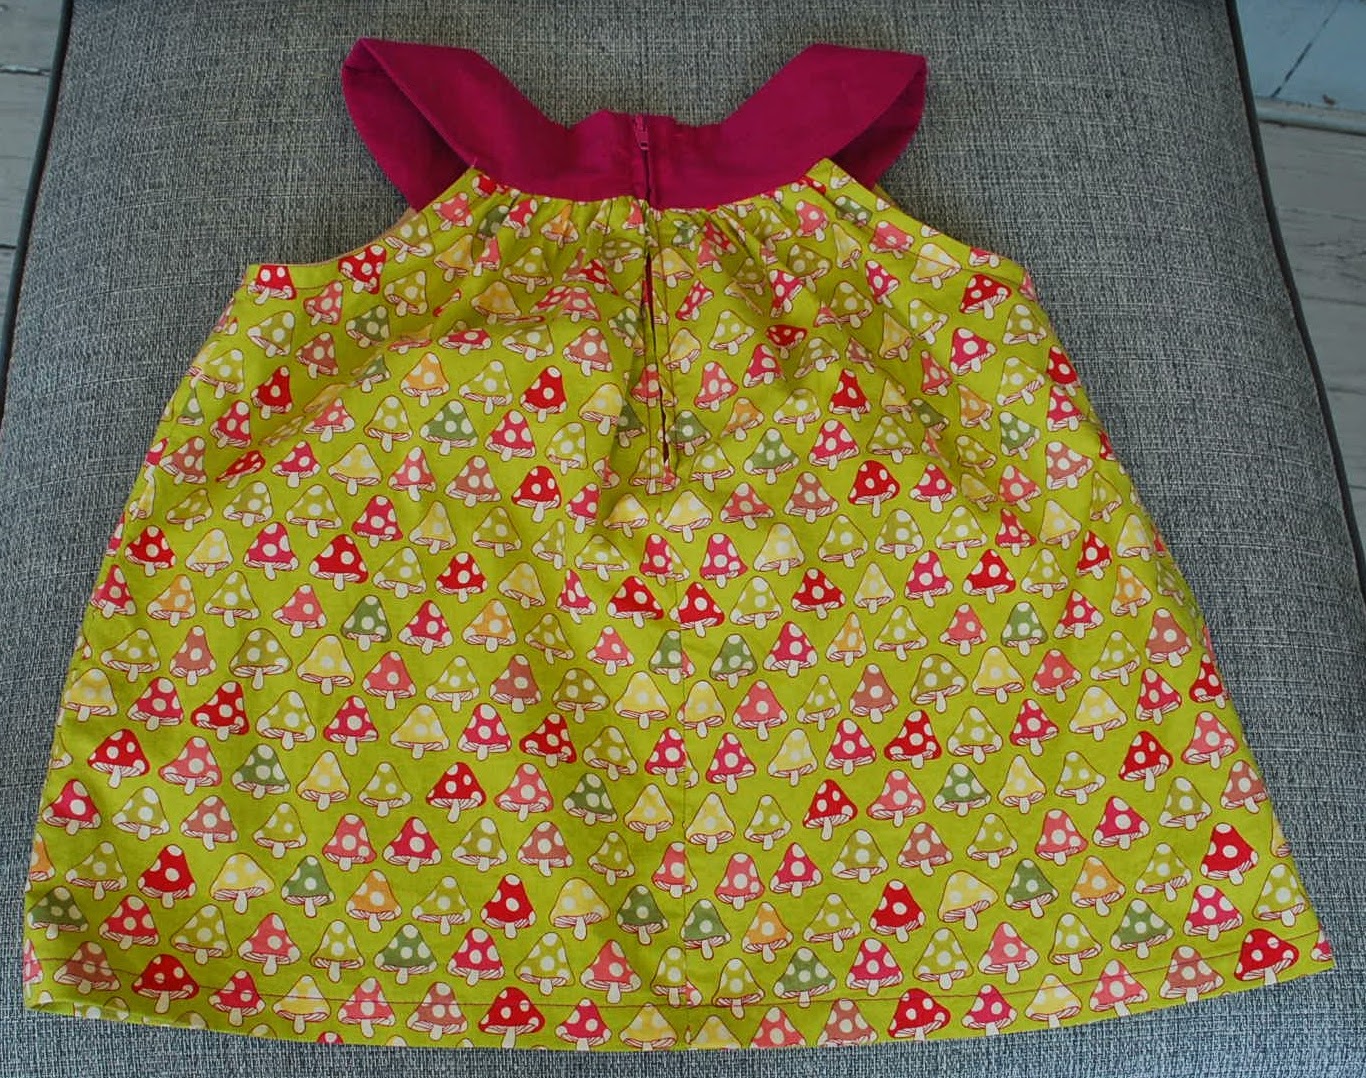
Mushroom magic


I'm finally getting to some sewing that I meant to finish years ago, when my daughter had less surface area and a little fabric went a lot further (more on this here). This was initially purchased for a whole set, before I knew I'd have a child who'd refuse to wear anything but "skinny pants" no matter the weather - depths of winter, the hottest, sweatiest day of summer, and everything in between.

In any case, I'm setting aside the leftover shot cotton that was to have been pants and saving it for something else. And here's the top, McCalls 5568, in all its mushroom excellence:


How I ended up with two identical patterns (this one and M6059 are the same but for elasticized pocket tops) is beyond me but probably had something to do with the fog that was 2010. It's looking a little big, which is fine by me because summer's half over (waaaah, says this teacher!) and I want to see this get a full run in 2015, too.

I love the options for contrast fabric in this style of top and chose a raspberry shot cotton for the yoke. My model chose a rust-toned pair of skinny pants to wear, which highlights the other dark tone in the fabric. The only drawback of this model in my mind is showing so much skin in summer which requires applying tons of sunscreen.


Sunday, July 20, 2014

Summer lawn flowers


I received a beautiful piece of Alexander Henry cotton lawn for my big birthday, but just one yard. This proved a bit of a challenge when choosing a pattern that would cover either my upper or lower body. I ended up going with the first thing I found in the house, Simplicity 4583. The pattern was favorably reviewed on Pattern Review and I knew I'd made it at some point in my life as a dress. The fabric looked great once lined with unbleached muslin - the colors popped just a bit more and the lining gave the lawn a bit more structure, which I appreciate as I age.

Usually I find that commercial patterns are way too big on me, so I was a bit dismayed when I tried on the top before inserting the zipper. Yikes! Time to lay off those brownies, people. I needed to rip out my side seams from the band down and pare my zipper seam allowance down to the bare minimum. I also found the whole part above the band to be a bit too wide for my shoulders and bust. Oh, and the darts hit a bit high on me, too. But other than that, really just perfect. And I do still love the fabric.

From the front


From the back - a bit dicey in the midsection


Saturday, March 29, 2014

The dress that wasn't

I'm back! I've been sewing lots over the past year but only for Liloup (my Etsy shop). Alas, the shoemaker's children have suffered as a consequence.

Years ago, as in, back when my daughter was in a snap n' go carseat and could be driven to another state to spend a few hours chilling in her stroller while I devoured a fabric store, I bought this great fabric to make her a dress. It's from Portsmouth NH and the orange-ish shot cotton at the yoke is heavenly. Based on the amounts of fabric I bought, I can surmise that at the time, I was thinking that I had plenty of time to make something for her in a size 1. It was 2010, after all.

Fast forward three years. The kid's about to turn four and that fabric is still sitting around. Happily, a small post-it note stuck to the pattern at least told me what I was supposed to do with it. And there were was still enough fabric to make a blouse before her birthday:

The excitement that everyone should display when receiving a homemade gift
Forgive the flash and enjoy seeing the fabric very, very clearly.
The specs: McCall's M6059 in size 4 (the motivation to finally make this was that this is the largest size in the pattern, folks!). Easy to construct but still took some time to make elastic casings for the pockets, gather the yoke, etc. I love gathers on girls but man, are they slow and messy.

By the time I picked her up at daycare that afternoon (she wore my outfit to school the very next day, people! I love this kid!), she had pared it down to just the tunic, no undershirt. Hey, it was at *least* 40 degrees out, so...  It gaped a bit under the arms but I don't think she minded a bit.


Wednesday, February 20, 2013

Spring Kerchief


I've used up my leftovers from the hedgehog sweater to make a new triangle-shaped scarf.  My old triangle-shaped scarf, lacy and fuschia, is a bit ratty from daily wear all winter.  I still remember the summer of 2002 when I spent a week swearing like a sailor on the beaches of Block Island as I knit it. Triangle-shaped scarves are great to wear, because they loop so well around the neck without bulking up, but those long rows are never ending.  Especially when you've made a mistake in a lace pattern and are ripping backwards into no mans land.

This time, I went for something simpler and got a great start on it during a family vacation to Florida.  Have you noticed that I love knitting wool on warm beaches, preferably with a little sand and sunscreen mixed in?  Then you need to know that I was raised by a mother who carded her own wool and picked her own fleeces on the beaches of Martha's Vineyard throughout the 70s and 80s.
Snow below suggests that the Spring part of this Kerchief is yet to come...
The pattern is Seattle Yarn's Spring Kerchief by Ruth Bowen, which I found on Ravelry.  Their advanced search tool, where you plug in how much yarn you have and what you want to make, and it spits out free patterns, is so so glorious and amazing.  I nearly finished three partially used-up balls of Rowen Felted Tweed DK.  This pattern is great but you need to be psychologically prepared for the cast-off ruffle row, which took me almost 4 hours (which is to say: a faculty meeting, a drive to my parents, part of The Help - so bad that I couldn't finish it - and one of the kids' weekend naps).  I wasn't tracking my time on this project until then, but I think that row represents a good chunk of it.


Sunday, February 10, 2013

Ballet skirt

In celebration of having an accepted offer on our home, I've busted out all my sewing gear and allowed it to overtake our living room once again.  Ahhh, the soothing feeling of knowing your ironing board and serger are ready at a moment's notice and not buried in your children's bedroom closet just when you really need them.  Let's just hope this deal goes through and I am not forced to undo everything for an open house or showing in the coming weeks!

Now, down to business:

Sassy Miss L is taking ballet classes and it is a HOOT.  We are slowly gathering the right "gear" for this experience (leotard, slippers, tutu, sparkly shoes, tights...), including the newest addition: a ballet skirt.  I took this tutorial and added some vintage fabric from my parents' attic to get this:


I love the happy coincidence that the flower overlaps exactly to continue the pattern across the front.  And that it breaks up that otherwise unending stretch of light pink from head to toe.  It's 9" long so that she won't get caught up in it or trip, and I cut the fabric about 30" around.  I was shocked to see that her waist elastic measurement is the same as what I usually cut for a 6 month old - how can that be?!  The shaping of the front was done with my snazzy new curved ruler, as suggested in the aforementioned tutorial.

Now it's just time to dance, dance, dance.

Saturday, January 19, 2013

Kindle cozy

Just whipped this up, a belated Hannukah present for my husband (he got the Kindle, too).  It's from this tutorial, which is perfectly easy to follow.  Basically you rip apart a binder and use its chipboard to create the bones - then you cover it in fabric.  An old headband serves as the elastic to keep the Kindle in place and to close the whole thing up.  Doing the math to figure out all the dimensions takes awhile, as does cutting through chipboard with an Xacto knife.  I didn't love machine-sewing right next to chipboard, but it definitely works!

Are you wondering about the fabric choice?  I took out a big heap of all my "manliest" fabrics for hubby to choose from - and one fabric for sewing a baby present.  Guess which one he chose?
Here it is all folded up, held shut with a wraparound elastic
You can prop up the Kindle for reading, which seems useful

Saturday, October 27, 2012

Faux cable cap

What a treat to knit something quick and lovely for a friend.  This chemo cap comes from this pattern, which I found on Ravelry (do you know Ravelry?  It's like Facebook for knitting geeks.  I wish they had one for sewers).  It's knit from Classic Elite's Inca Alpaca in blue dusk and I'm hoping it will be absorbent and itch-free for its wearer.  I made the whole thing en route to my parents' last weekend and while lounging during the kids' naptime - maybe 5 hours on the needles.  The faux cable is satisfying and easy.  I added 10 stitches to my cast-on to accommodate the thinner yarn I chose, and knit until I was out of yarn so that I'd have the tallest cap possible to cover the whole hairline.


Tuesday, August 7, 2012

The Elegance of the Hedgehog


It's been so long since I knit something for myself that I can't actually recall what my last project was...something that predates both my Ravelry site and our computer's digital photo library, apparently.   Last winter, I was lucky to receive some Rowan felted tweed DK yarn for the purpose of making my own Paper Dolls sweater.  The pattern's author is from Edinburgh and blogs widely on the history of textiles, British wool production, knitting over the ages, and more.  Definitely a more intellectual read than most knitting blogs.

I love Kate Davies' writing but I did not love knitting up her pattern.  Everything took a terribly long time (casting on alone exceeded a two-hour car drive, which is pretty much a month's worth of knitting by my current standards).  I made matters far too complicated by trying to use a different yoke color pattern (hedgehogs) than her original pattern (paper dolls).  This meant adding lots of stitches in order to do the hedgehog repeats, and then having to fudge all of the yoke decreases to get back down again.  I guess I was just mad with desire over the versions I'd seen on Ravelry.

The sweater features two of my favorite colors (apple green and purple) and fits like a glove.  I stretched it a bit while blocking to try and give myself some more breathing room.  The patterning above the hedgehogs is very warped-looking, which I can't explain.  Rowan's yarn left fibers everywhere I knit but was very forgiving when it came time to block and dry.
While hedgehogs are a bit childlike for someone heading precipitously towards 40, I think they're sweet.  Since my classroom is uncontrollably overheated, I'm hoping that a short sleeved sweater will be a wearable garment as winter approaches.  When the temperatures dip below the mid-80's here, I will include a picture of me wearing my hedgehogs.

P.S. Have you read The Elegance of the Hedgehog?  I read it in French but didn't love it.  Maybe that should have told me something about knitting this sweater!